Installing lights by guesswork leads to two outcomes: dangerous shadows over your table saw or wasting money on electricity you don't need. Precision matters.
If you are planning a workshop retrofit or a new build, "bright enough" isn't a technical specification. To achieve safety, visual acuity, and efficiency, you need to execute a precise lighting calculation for workshop environments to determine the exact amount of light reaching your workbench—not just the floor.
How do you calculate lighting for a workshop?
To calculate workshop lighting, use the modified Lumen Method formula: Total Lumens Needed = (Target Foot-Candles × Square Footage) / Light Loss Factor.
For a standard workshop, target 50–75 foot-candles for general assembly and 100+ foot-candles for detailed bench work. Always divide your result by a Light Loss Factor (LLF) of 0.75 to account for dust accumulation and LED aging.
II. Establishing the Target: Foot-Candles vs. Task Type
Before you calculate lumens, you must define "Success." Lighting requirements correspond directly to the size of the detail you are trying to see. The Illuminating Engineering Society (IES) and OSHA provide distinct standards.
While OSHA sets minimums for safety (preventing trips and falls), a productive workshop requires IES-recommended levels for visual tasks.
The "Workplane" Concept
Stop measuring light at the floor. In a workshop, your "Entity of Value" is the Workplane—typically 30 to 36 inches off the ground (bench height). A lighting plan that puts 50fc on the floor might only deliver 35fc to a raised engine bay if the beam angle is too narrow.

Recommended Lighting Levels (2026 Standards)
| Task Type | Recommended Foot-Candles (fc) | Recommended Lux (lx) | Context |
|---|---|---|---|
| General Storage / Movement | 30 fc | 320 lx | Moving lumber, parking vehicles, general cleanup. |
| General Bench Work | 50–75 fc | 540–800 lx | Carpentry, automotive repair, medium assembly. |
| Fine Detail Work | 100–125 fc | 1,075–1,350 lx | Electronics, fine sanding, model making, finishing. |
| Visual Inspection | 150+ fc | 1,600+ lx | Detecting paint swirls, scratch inspection. |
III. The Step-by-Step Calculation (The Lumen Method)
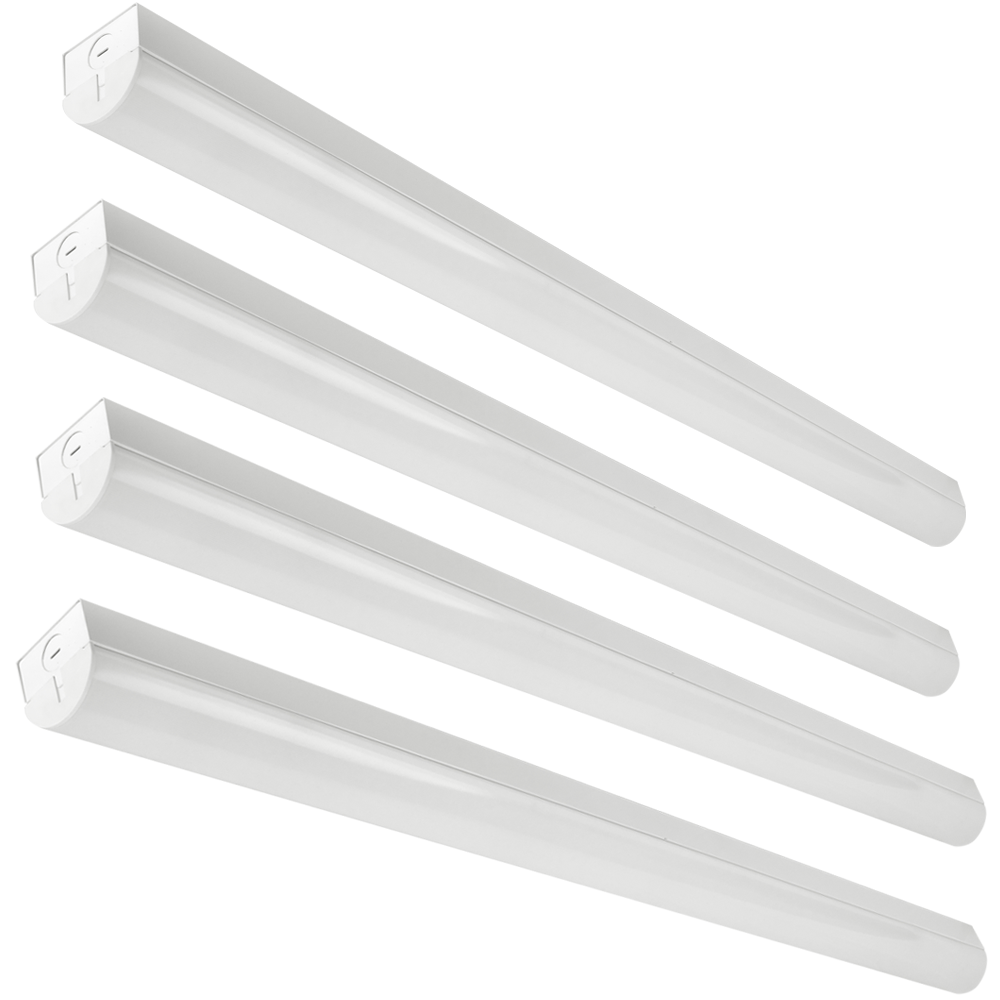
Use this process to determine exactly how many fixtures you need. We will use the Konlite 8ft LED Strip Fixture (up to 10,400 lumens) as our baseline for the calculation examples.
📺 Related Video: how to calculate workshop lighting lumens

Step 1: Measure the Task Area
Calculate the square footage (L × W) of the area you want to illuminate.
- Pro Tip: If you have a 1,000 sq ft shop but only work in one corner, calculate the lighting for that zone specifically (Zonal Lighting) to save energy.
Step 2: Determine Your Target
Select your target foot-candles from the table above. Let's aim for 75 fc (High-end General Work).
Step 3: The "Real World" Formula
Most online calculators use a simple formula (Sq Ft × FC). This is wrong. It assumes your shop walls are perfect mirrors and your lights never get dirty.
The Correct Formula:
Total Lumens Needed = (Square Footage × Target Foot-Candles) / 0.75 (LLF)
-
Why 0.75? This is your Light Loss Factor (LLF). It builds in a 25% buffer for:
- Dirt Depreciation: Workshop dust settling on the lens.
- Lumen Maintenance: For a deeper dive, read about Understanding LED Technology and how LEDs dim slightly over 50,000 hours.
- Absorption: Dark concrete floors and open stud walls absorb light rather than reflecting it.
Step 4: Convert Lumens to Fixture Count
Once you have the Total Lumens Needed, divide it by the lumen output of your chosen fixture.
Quick Calculation Example:
- Shop Size: 20ft × 20ft (400 sq ft).
- Goal: 75 Foot-Candles (General Bench Work).
- Math: (400 × 75) / 0.75 = 40,000 Lumens Needed.
- Fixture Selection: Using a fixture with 10,400 lumens (80W setting).
- Count: 40,000 / 10,400 = 3.84.
- Result: You need 4 fixtures.
IV. Variables That Ruin Your Math (Attribute Depth)
Generic calculators ignore the physical environment. To ensure your lighting calculation for workshop efficiency matches reality, consider these semantic attributes.
1. Ceiling Height & Beam Angle
The Inverse Square Law states that doubling the distance from the light source reduces intensity by 75%.
- Under 10 ft Ceilings: Use wide-beam fixtures (120°+) with frosted diffusers, like the polycarbonate lens on the 8ft LED Strip, to spread light evenly without blinding hot spots.
- Over 15 ft Ceilings: You are entering High Bay Lighting territory. You need narrower beam angles to punch light down to the workplane.
2. Light Loss Factors (LLF): The Dust Reality
In a woodworking or welding shop, Luminaire Dirt Depreciation is the biggest enemy. Electrostatic dust sticks to plastic lenses.
- Strategic Fix: If you work in a high-dust environment, lower your LLF variable in the formula to 0.65 to ensure you still have adequate light one year after installation.
3. Color Temperature (CCT) and CRI
Brightness (Lumens) is quantity; CRI (Color Rendering Index) is quality.
- Kelvin: For workshops, standard "Warm White" (3000K) is too relaxing and can distort color perception. 5000K (Daylight) is the standard for industrial precision because it maximizes contrast.
- CRI: High CRI (80+) ensures that "red" wire looks red, not brown. This is critical for electrical safety and paint mixing.
V. Advanced Optimization: Grid Layout & Spacing
Having 40,000 lumens is useless if they are all in the center of the room. You must optimize for Uniformity Ratio.

The 1:1 Spacing Rule
A safe rule of thumb for DIY layouts is the 1:1 ratio.
- The Rule: Keep the distance between fixtures equal to or less than the mounting height above the workplane.
- Example: If lights are mounted 8 feet above your workbench, space the rows no more than 8 feet apart. This ensures the beam angles overlap, eliminating shadows.
Zonal Lighting Strategy
Instead of lighting a 2,000 sq ft warehouse to 100fc (which is expensive), use a tiered approach:
- Ambient Layer: Light the whole space to 30fc using 8ft Strip Fixtures for safe movement.
- Task Layer: Install dedicated high-output fixtures directly over workbenches to hit 100fc.
VI. Entity Comparison: Specifying the Right Tool
Not all lumens are created equal. Here is how modern Wattage-Selectable LED Strips compare to legacy workshop lighting.
| Attribute | Konlite 8ft LED Strip (Selectable) | Legacy T8 Fluorescent (4-Tube) | Cheap "Corn Cob" LED Bulb |
|---|---|---|---|
| Luminous Flux | 7,800 – 10,400 lm (High Output) | ~5,000 lm (drops quickly) | ~3,000 – 5,000 lm |
| Luminous Efficacy | 130 lm/W (Energy Efficient) | ~80 lm/W | ~90 lm/W |
| Lifespan (L70) | 50,000+ Hours | 15,000 Hours | 10,000 Hours |
| Glass/Lens | Frosted Polycarbonate (Shatterproof) | Glass (Fragile hazard) | Exposed LEDs (Glare hazard) |
| Versatility | Wattage & CCT Selectable | Fixed | Fixed |
VII. What Users Say (UGC Insights)
Analyzing feedback from workshop owners who switched to high-lumen LED strips reveals clear patterns in User Experience:
- The "Aging Eye" Factor: Many users over 50 report that upgrading from 30fc to 70fc reduced headaches and eye strain significantly.
- Installation: Users prefer 8ft fixtures over 4ft options because they require fewer electrical drops to cover the same linear footage.
- Cold Weather Starts: Unlike fluorescent ballasts that flicker in unheated garages, the LED drivers in these fixtures ignite instantly down to -4°F.
VIII. Conclusion
Correct workshop lighting is a calculated decision, not a guess. By using the Lumen Method with a realistic Light Loss Factor, you ensure that your workspace remains safe and precise for years, not just on day one.
Don't settle for shadows. Calculate your needs, round up your lumens, and prioritize high-efficacy fixtures that deliver light exactly where your work happens.
Ready to upgrade?
Explore the full specifications of the 8 Ft LED Strip Light Fixtures (Selectable Wattage & CCT) to find the perfect match for your calculation.
Related Reading: LED High Bay Lighting Guide | Understanding LED Technology