Are you tired of burning electricity by accidentally leaving your outdoor floodlights on all day? Or worse, coming home to a pitch-black driveway because you forgot to flip the switch?
Installing a photocell (also known as a dusk-to-dawn sensor) is one of the most effective upgrades you can make to your home’s exterior. It automates your security lighting, ensuring fixtures turn on exactly when needed and off the moment the sun rises.
However, wiring one isn't just about matching colors. If you ignore the physics of sensor orientation or the hidden danger of LED inrush current when learning how to install photocell sensors, you’ll end up with a light that strobes like a disco ball or a sensor that fails in a week.
This guide will walk you through the safe, step-by-step process of installing a photocontrol sensor, explaining the specific 3-wire logic that generic guides often miss.
What is a Photocell? (And Why Yours Might Fail)
A photocell is a light-sensitive switch that interrupts an electrical circuit based on ambient light levels. When the sensor detects darkness (usually < 1-3 foot-candles), it closes the circuit, allowing power to flow to your light fixture. When it detects sunlight, it opens the circuit, cutting the power.
Critical Attributes for Compatibility
Before you strip a single wire, ensure your sensor matches your system. Mismatched components are the #1 cause of failure.
- Voltage Rating: Most residential sensors are rated for 120V. Commercial fixtures often require 208V-277V sensors. Installing a 120V sensor on a 277V circuit will instantly destroy it.
-
Load Type (The LED Trap): This is the most overlooked attribute. Old thermal photocells were designed for Tungsten (incandescent) bulbs. Modern LED drivers have a massive "inrush current" (a spike of power at startup) that can weld the contacts of cheap sensors, causing them to stick "ON" permanently.
- Pro Tip: Always look for "LED Compatible" or "Electronic" photocells, not the old thermal bi-metal types.
-
Mounting Style:
- Stem Mount: Fits through a standard 1/2-inch knockout hole in a junction box. (Focus of this guide).
- Twist-Lock: Uses a NEMA receptacle, common on utility poles.

Preparation & Safety: The Contextual Foundation
Working with Line Voltage requires absolute caution. You aren't just plugging in a toaster; you are modifying a hardwired circuit.

Tools You Will Need
- Non-Contact Voltage Tester: To verify the power is truly off.
- Wire Strippers: capable of stripping 12-14 AWG wire.
- Weather-Resistant Wire Nuts: Essential for outdoor junction boxes to prevent corrosion.
- Electrical Tape: For securing connections and testing the sensor.
- Silicone Sealant: To waterproof the knockout entry.
Before opening any junction box, turn off the specific Circuit Breaker at your main panel. Never rely on a wall switch to cut power. Always test wires with a voltage tester before touching them.
Step-by-Step: How to Wire a Photocell
Most modern stem-mount photocells utilize a standardized 3-wire configuration. Understanding the specific role of each wire is key to building a working circuit.
📺 Related Video: how to wire a photocell sensor
The 3-Wire Connection Logic
The confusion usually stems from the fact that you are introducing a "switch" into the power line. Here is the Entity Relationship for the wires:
- Black Wire (Line): Connects to the Source power (from the house). This brings electricity into the sensor.
- Red Wire (Load): Connects to the Fixture (light). This sends electricity out of the sensor to the bulb.
- White Wire (Neutral): Connects to Line and Load neutrals. It completes the circuit for the sensor's internal electronics.
Wiring Cheat Sheet
| Photocell Wire Color | Connects To... | Function |
|---|---|---|
| Black | House Power (Black) | Input Power (Line) |
| White | House White + Light White | Common Neutral |
| Red | Light Fixture (Black) | Switched Power (Load) |
Execution Steps
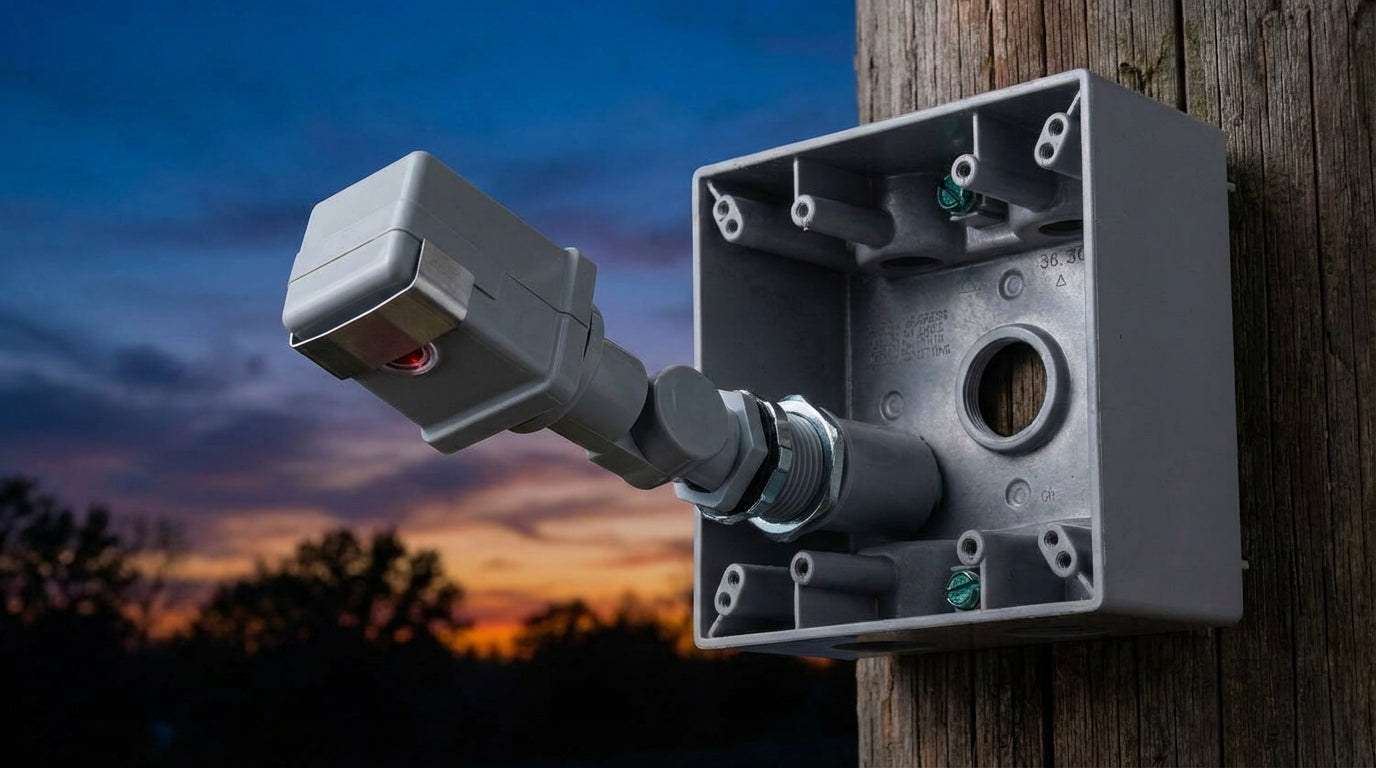
Step 1: Access the Junction Box
Remove the existing light fixture or the cover of the junction box. You should see a Black (Hot) wire and a White (Neutral) wire coming from the house.
Step 2: Prepare the Knockout
Punch out a 1/2-inch knockout on the junction box. Insert the photocell stem through the hole, ensuring the rubber gasket is on the outside to seal against rain. Secure it from the inside with the provided locknut.
Step 3: Make the Connections
Using your wire nuts, follow the logic above:
- Neutral: Connect the Photocell White wire to both the House White and the Fixture White. (3 wires total in this nut).
- Line (Power In): Connect the Photocell Black wire to the House Black wire.
- Load (Power Out): Connect the Photocell Red wire to the Fixture Black wire.
Step 4: Seal and Finish
Once wired, carefully tuck the wires back into the box. Apply a small bead of silicone around the photocell stem where it meets the box to ensure it is watertight.
Positioning & Troubleshooting: The "Information Gain" Section
This is where most DIY installations fail. If you wire it correctly but position it wrong, your lights will flicker, cycle, or stay on all day.

1. The Science of Orientation (Why Face North?)
You will often see instructions to point the sensor "North." This isn't superstition; it's physics.
- North-Facing sensors receive consistent indirect ambient light (sky glow) rather than direct sun rays.
- West-Facing sensors get blinded by the intense setting sun, potentially burning out the photo-eye over time.
- South-Facing sensors receive the most direct solar radiation (in the Northern Hemisphere), which accelerates UV degradation of the plastic lens.
The Rule: Point the "Eye" North. If North is impossible, aim it downwards at a 45-degree angle to view the ground, shielding it from direct sky exposure.
2. Preventing "Cycling" (The Strobe Effect)
Cycling occurs when the light turns on, the sensor "sees" the light from the bulb, thinks it is daytime, and turns the light off. This repeats every few seconds, creating a strobing effect.
- Solution: Ensure the sensor is physically behind the light source. If the sensor is built into the fixture, use the small metal slider (shutter) provided with the photocell to restrict its field of view, blocking the reflection from the bulb.
3. LED Inrush Protection
If you are upgrading to high-lumen LED fixtures, standard photocells may fail quickly. The LumiMuse LED Outdoor Flood Light (RKFL03 Series) is designed with this in mind. It handles the aggressive inrush current of its 200W LED driver without welding the sensor contacts, a common issue when retrofitting powerful LEDs with cheap generic sensors.
FAQ: Common Photocell Problems
Q: Why does my light stay on all day?
A: This usually indicates the contacts have welded shut inside the sensor (due to a power surge or LED inrush current) or the wiring is incorrect (Black connected directly to the light). It requires replacing the photocell.
Q: Can I install a photocell on a circuit with a switch?
A: Yes. If you turn the wall switch OFF, the photocell and light will lose power. When the switch is ON, the photocell takes over control. This is a good way to "reset" the sensor if needed.
Q: How do I test it during the day?
A: Most sensors have a built-in delay (2-5 minutes) to prevent false triggering from car headlights. To test, cover the sensor completely with black electrical tape. Wait up to 5 minutes. If the light turns on, the installation is successful.
Conclusion
Installing a photocell is a straightforward electrical upgrade that pays dividends in security and energy savings. By understanding the Line vs. Load distinction and respecting the orientation physics, you can ensure your lights operate autonomously for years.
If you are looking to light up a large area—like a backyard, barn, or parking lot—and want to avoid the hassle of wiring a separate sensor, consider an integrated solution like the LumiMuse RKFL03 Series. With 30,000 lumens of output and a factory-integrated photocell, it eliminates compatibility guesswork and provides instant, massive illumination right out of the box.
Ready to secure your perimeter? Browse our full guide on Outdoor Solar Motion Sensor Lights or learn How Smart PIR Sensors Work to further protect your home.